Monthly Archives: January 2012

My first Android app live – DigiTech Patch Viewer!

(This post was edited 0209 hours 5th March 2012 +0800 GMT for Version 1.1.)

So I’ve finally uploaded my first (fully-completed) Android app to the Android Market!

Available in Android Market
DigiTech Patch Viewer

This lets you open DigiTech RP155, RP250 and RP255 multi-effects patch files using your Android device.

Ever been jamming at a friend’s place, or a studio, and you wanted to dial in that certain tone, but you couldn’t get it right? Then you Googled it on your phone but you find that in order to get the tone, you need to fire up X-Edit on a proper computer or laptop, and connect the RP255 by USB?

My app lets you view the patch – you’ll still have to dial in the settings manually. For convenience, all the settings are arranged as they are on the pedal!

Now it would be awesome to connect the pedal to an Android device via USB, but I don’t have an Android device with USB Host functionality and even then that might be too daunting a task! (I don’t have a Near-Field-Communication-supporting device, either…)

The RP155 and RP250 have beta support as of version 1.1, in the Android Market now. It may not show certain values, so contact me if you find such a patch file.

The RP255 is the only one I have to test all settings with – hit me an email if you’d like to help to test with your other DigiTech RP series multi-effects pedal! Fortunately, the RP presets are all plain, human-readable XML, so it’s quite easy – can’t say the same about other brand patch files.

If you have trouble opening patch files from your stock browser, use Firefox for Android. I found the Samsung Galaxy Note stock browser, for example, will rename any unknown files to *.bin.

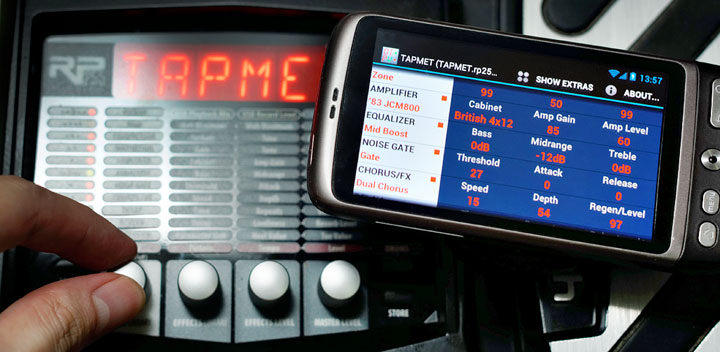
In other news, I have a sample patch file – this is my current go-to metal patch, called “TAPMET”. It’s a high-gain balls-out metal patch with an interesting twist – the expression pedal is set to control equalizer mid levels.

TAPMET – click to download!

So if you push the expression pedal down at the heel, you get scooped mids (bass: 0, mid: -12, treble: 0) for some crunchy thrash metal rhythm, and when you push the expression pedal forward at the toe, you get a searing hot tone (bass: 0, mid: 12, treble: 0) for some tasty lead solos!

From various TT sessions in 2011


The Nikon F3, with the pentaprism removed.


Hairee through the Minolta 100mm F2.8 Macro on the A900.


Digital Life Expo 2011, at KLCc Convention Center, I think.


Another one from the DLE. There really wasn’t much to see, and the title already hints at a convergence.


Fire in the hole!


Another TT, also at KLCC.


This one at A&W PJ – the Sony 50mm F1.4 on the A900.


The classic Minolta look is gotten through this Minolta 85mm F1.4G on the NEX-5.


This is the Super SteadyShot mechanism.


This is a cheapo Fader ND – obviously made of two ND filters screwed together. Uses the same cross polarizer effect I blogged about 6 years ago.


This was shot with the help of Live View.


The 1Nikkor 10-100mm F4.5-5.6 Power Drive ZOOM VR!


Man, the lanyard gets in the way of me scanning her.


The Olympus 45mm F1.8 through an Olympus EP-3. What a lovely little lens!

In Dear


So a bunch of us went down to Jalan Masjid India to do a street shoot! (I particularly like how there is a sense of depth in this picture.)


Unregular angle.


The trick is to use a wide lens and pretend you’re focusing on something in the distance. I guess the guy wouldn’t know that I was using a 24mm on full-frame.


Crowds are usually fun – ask them who is playing tonight!


Headscarves.


Men with more cloth than women here (thankfully.)


The Opteka 85mm F1.4 on the A900 for awesome separation! Now that I look at this I wonder how it would look stopped down, to show all 3 flows of human traffic.


This, meanwhile, has human traffic 90 degrees off the axis of car traffic.


We reached the familiar ruins of Dang Wangi.


Even more overrun than before, with far more shrubbery.


A less familiar one.


I have no idea what this means.


Then, just nearby, lay a dead bird – already dead when we saw it.


Coincidentally there was a rubber band, almost as if it was a hint of the murder weapon.


After all that, I walked to the monorail station. Standing in the way of traffic helps people ease up to the fact that you’re there, taking a picture of them – don’t go into their space and take their picture – instead, wait for them to enter your space and then take the picture! As far as she knows, she was just getting in the way of my picture. You might as well fake such an expression while waiting for the subject to leave the frame.

Relationship Status: A Review

Greetings! I have something special for you today – a wordy blog post!

So I watched Relationship Status, a film by Khairil M. Bahar. (As a disclaimer – I know him and a few cast members and some behind-the-scenes people.)

A cautionary note: I often struggle to write a review of something if I know what I would criticize and forget how to underline the good bits.

The film is about a bunch of loosely-connected people who are in various types of relationships – with the general theme of Facebook, and its “relationship status”, affecting how they act and who they meet. The film is, well, mostly a lot of dialogue, with little or no action, other than one slap and mild pillow action. One might call it somewhat draggy because of this.

On the plus side, the dialogue is very real, and the pacing and articulation is what you experience in real life – kudos to all the amazing actors – but you might realize that Hollywood caters to the short-attention-span generation, and your typical movie scene is shorter, wittier, more dramatic, and faster-paced. As I watched the dialogues, it was as if I was an invisible fly, sitting in my neighbor’s house, listening to them have a leisurely talk.

I’m not sure if it’s just me, being a photographer, but it did bother me each time the Canon 5D Mark II used to shoot the movie, went out of focus – and it did, many times, with some scenes having the sofa be in focus, or the camera operator was inexperienced with focus pulling, especially when the actor was moving in the scene. It’s quite apparent when there is a sharp zone of focus across an actor’s cheeks but not anywhere else! I’d rather stop the lens down just a tiny bit as a full-frame video camera is unforgiving.

You know what movie has awesome bokeh? The Twilight Saga: Breaking Dawn: Part 1. I kid you not. The bokeh in that movie is awesome – backgrounds are painted with a lush, rich, saturated brush.

The other niggle I had, which might’ve been the projector, was the white balance – many scenes were shot (seemingly) with room lighting only, so you get the icky flourescent green and a pallid greenish orange for tungsten. It gives too much of an indie look which distracted me from the conversation – honestly I’d rather set the white balance to appear like daylight as that is how humans perceive it.

The camera angles are good, though there was one bit in Daphne/Tony’s scene where they are having a conversation, and it looks like the camera operator is standing in front of the sofa they are sitting on. It suddenly jumps to a eye-level shot of Daphne as she says something pivotal. Impactful, perhaps, but strange.

And of course there’s that rather bumpy baby bump. I did enjoy the scenes with Ruzana/Daphne, though, with the audience feeling the tense build up to the inevitable. I wish more of the movie was like this!

The movie starts with a guy writing “Hope your well” on a girl’s Facebook wall. Now this would be alright… if he wasn’t a writer. Apologies for the Grammar Nazi outburst. Heil The Queen’s English!

Hmmm, or was it a snide poke at how social networks and the Internet have killed our command of English? Then again, English is a language with terribly inconsistent rules.

Interestingly, Davina, and the character she plays, has the same birthdate! I wonder what other nuggets are there e.g. Ilmar.

I don’t know if it’s because I know Khai, and I’ve seen his previous movie, Ciplak (which was awesome, and high on entertainment value and his trademark humor) that I couldn’t help but feel that this was not what I had expected. Plus he had experience in the Malaysian film industry, as well as short films of all sorts (which I always looked forward to, because of entertainment value).

Nevertheless, it is a good movie that feels real. So please go watch Relationship Status at a TGV near you today! (Also, TGV has massively overhauled their site and it is real snazzy that it doesn’t need any plugins. Well done!)

35mm Showdown

Here’s a casual comparison of a few 35mm lenses on the Sony Alpha NEX-5!


From left to right: Samyang 35mm F1.4 ED AS UMC ED AS UMC, Sony 35mm F1.4G, SLR Magic 35mm F1.7, Sony 35mm F1.8 DT SAM DT SAM, Carl Zeiss Biogon T* 35mm F2.0 ZM with Kipon M-mount to E-mount adapter.

All shots at 1/60s ISO200 in Manual Exposure on the Sony Alpha NEX-5 with the Sony LA-EA1 A-mount to E-mount adapter, or the Kipon M-mount to E-mount adapter, where appropriate. The aperture was adjusted from wide open, to F2.0, and then F2.8. I intentionally did not change the shutter speed, but changed the exposure in RAW (for example, an exposure at F1.4 has an EV of 0 while an exposure at F1.8 is compensated by +0.7EV and F1.7, +0.5EV.)

All RAWs were processed in DxO Optics Pro Elite 7.0 with DxO Lighting turned off and a fixed WB of 4628 Kelvin, +6 Magenta compensation. You may notice some differences in exposure – whether this is down to F1.4 being not exactly 1 stop brighter than F2.0, or DxO not linearly adding +1 EV, I do not know.

The other difference may be in the white balance, since this was shot in flourescent light. Thus pay no attention to variances in white balance unless all samples from the same lens, have a certain color cast.

The objective of this test was to compare bokeh, originally, but you might also be able to judge light transmission, color and contrast. Sharpness is variable as I focused on the chair (without realizing there was chipped paint that I could’ve used as a focus reference point.)

All images are clickable for a full-size image. EXIF data is also included in both full-size images and thumbnails (if you can call these thumbnails.)


Samyang 35mm F1.4 ED AS UMC at F1.4


Samyang 35mm F1.4 ED AS UMC at F2.0


Samyang 35mm F1.4 ED AS UMC at F2.8


Sony 35mm F1.4G at F1.4


Sony 35mm F1.4G at F2.0


Sony 35mm F1.4G at F2.8


Sony 35mm F1.8 DT SAM at F1.8 (+0.7EV)


Sony 35mm F1.8 DT SAM at F2.0


Sony 35mm F1.8 DT SAM at F2.8


Carl Zeiss Biogon T* 35mm F2.0 ZM at F2.0


Carl Zeiss Biogon T* 35mm F2.0 ZM at F2.8


SLR Magic 35mm F1.7 at F1.7 (+0.5EV)


SLR Magic 35mm F1.7 at F2.0 (may not be exact due to stiff aperture ring)


SLR Magic 35mm F1.7 at F2.8 (may not be exact due to stiff aperture ring)

A casual verdict:
The Sony 35mm F1.4G’s trademark spherical aberration is always there – a portrait-ful haze of softness around out-of-focus areas. The bokeh may vignette at F1.4 and be somewhat of a circle with a side cut away, but at least they remain circular and not a cats-eye shape (on APS-C at least as tested here). It retains that Minolta color. Unfortunately I misfocused so please ignore the sharpness aspect of this lens. I love this lens for its bokeh, really, and how it renders, but it’s not everybody’s cup of tea.

The Sony 35mm F1.8 DT SAM is contrasty wide open, especially in the out-of-focus areas. I can’t say this helps, really, as it makes the background contrasty and distracting. Zeiss lenses tend to look that way too. It also ‘paints’ out-of-focus with less distracting harsh edges (brightline bokeh) compared to the SLR Magic 35mm F1.7. It does not render softly wide open. The out-of-focus areas also pull out somewhat. Fortunately, it doesn’t seem to vignette out-of-focus areas.

I can’t say I like the colors from the SLR Magic 35mm F1.7. At F1.7 it has that pleasant portrait softness.

The Carl Zeiss Biogon T* 35mm F2.0 ZM does not disappoint – it’s a Zeiss and that means it’s sharp and contrasty wide open. Some lenses have great bokeh but this is not one of them – you can see some brightline bokeh here.

And finally, the Samyang 35mm F1.4 ED AS UMC – bokeh isn’t great, a bit distracting, and sharpness gets better at F2.0 (could be misfocus, though) and much better at F2.8.

More reading:
Not Through The Leica

Not Through The Leica


And now, for pictures of the Leica M6 TTL!


Mounted on it was the Carl Zeiss Biogon T* 35mm F2.0 ZM.


From the top. The flash sync is 1/50th of a second. The soft shutter release was also installed on this. Also note the film winder on the left is at a diagonal angle – I absent-mindedly tried to pull on that to open the film back! (As it is with all other manual-focus film SLRs.)


The back. The ISO is also set here. Strange that they’d say ISO and not ASA. There was also a PC Sync port below the flash hotshoe – note that in this case, PC Sync stands for Proctor Compur Sync (cable).


You’d remove the film by removing the bottom plate, and opening the back plate.


From the front. To the right of the lens mount is the frameline selector lever – press on it and it toggles between 3 sets of framelines. I believe this was the version with 0.72x framelines as its initial framelines were 28mm/90mm, 35mm/135mm, and 50mm/75mm.) (Thanks Neo for the correction!)

The top plate, from left, has the Rewind Lock lever (press this, and you’ll be able to rewind your film once you’re done) then the secondary window, the frameline window and the main window. What you see in the viewfinder is a combination of the secondary window and main window (with the framelines getting light from the frameline window.)

A problem with rangefinders is that you can cover your lens and take a picture, and not know it! Since you’re not looking through the lens, but through a separate window, there is also the issue of parallax – but the M6 cleverly adjusts for this by moving the framelines as you focus closers. Because of this parallax issue as well, I reckon, there is a limit of how close rangefinder lenses can focus.


This lens goes to 0.7 meters close.

Of course, there are some lenses that do focus closer, but often with an extra attachment.


Another interesting usability element in rangefinder lenses, is that they often have a knob for your thumb – so you could quickly focus to a certain distance by feel, by adjusting the knob to a known position.


A cheaper option to going digital with a Leica M-mount system would be to buy an adapter to a mirrorless camera system, like the Sony Alpha NEX system. On the left is the Sony Alpha NEX-5 with the Kipon M-mount to E-mount converter. The only thing you lose is a wide angle of view, since the NEX-5 has a 1.5x crop factor. Thus the angle of view of the 35mm on the M6 becomes like 52.5mm on the NEX-5.


Same lens, this time on the NEX-5. Very much possible this way due to the shorter flange distance of 18mm. A lens mount that has a bigger flange distance (distance from lens mount to sensor/film plane) than the lens being mounted, needs an adapter that has glass, to retain the ability to focus the lens to infinity. Of course, without the glass, it may become a macro-only lens! This is why you don’t see M-mount lenses being mounted on my A900, for example.

The other thing about these adapters with glass, is that the optical quality degrades and it is in fact a teleconverter, so you lose light and get a narrower angle of view.


Anyway, this is the Leica Noctilux-M 50mm F0.95 ASPH at the Leica Global Store at Avenue K.


This picture, and all pictures that follow, were shot wide open at F0.95.


I mounted it on the NEX-5 with the Kipon M-to-E-mount adapter.


Of course, APS-C lends more depth of field…


Creamy bokeh!


Of course, I’d rather test such lenses with portraits.

Here’s a great explanation of how rangefinders work:
http://photozone.de/slr-vs-rangefinder

More pictures here:
Leica Superia!
Leica Vista!

Leica Superia!


And now, for more from the Leica M6 TTL and Carl Zeiss Biogon T* 35mm F2.0 ZM combo! I love the color of this shot. Also, Papillon 1973 in Solaris Dutamas makes the best burgers around this area (second only to adding pork, which Brussels Beer Cafe is awesome at!)

There was also the memorable Fish & Chippery with fantastic cheeseburgers but that place closed down. 🙁


All shots were shot at F2.0 unless otherwise stated. No color, contrast or brightness adjustments were done – I just did an Unsharp Mask with amount 90%, radius 0.3 pixels, threshold 3 levels, before resizing it.


I used Fujifilm Superia X-TRA ASA400 for all pictures in this series. I believe this was shot at F8. As always, emerald greens are apparent!


I took a wild guess, aiming at about 2 meters. Fortunately this was nailed!


The view from my cubicle. Coder’s block.


Underexposure results in lowered contrast and muddy blacks.


Muddier! Shot at 1/15th of a second if I remember, to avoid motion blur.


Educated beggar.


The cliched homeless person street shot.


Petaling Street bags your attention.


A small enclave somewhere off Petaling Street hosted a lot of tattoo parlours!


Shoe man.

More here:
Leica Vista!