Category Archives: Geek

SmooTF!


I finally got the grand master of bokeh – the Sony 135mm F2.8/T4.5 Smooth Transition Focus! This is the undisputed king of rendering a smooth, clean and undistracting out-of-focus area.


It brings my number of primes to 8! Left to right: Peleng 8mm F3.5 M42 circular fisheye, Vivitar 24mm F2.0 OM-mount, Sony Carl Zeiss Distagon T* 24mm F2.0 ZA SSM, Samyang 35mm F1.4 ED AS UMC, Minolta 50mm F1.4 Original, Opteka 85mm F1.4, Sony 135mm F2.8/T4.5 Smooth Transition Focus, Sony Carl Zeiss Sonnar T* 135mm F1.8 ZA.


And, from above, left to right, row by row: Peleng 8mm F3.5 M42 circular fisheye, Opteka 85mm F1.4, Minolta 50mm F1.4 Original, Sony Carl Zeiss Sonnar T* 135mm F1.8 ZA, Samyang 35mm F1.4 ED AS UMC, Vivitar 24mm F2.0 OM-mount, Sony 135mm F2.8/T4.5 Smooth Transition Focus, Sony Carl Zeiss Distagon T* 24mm F2.0 ZA SSM.


The STF is physically a 135mm F2.8 lens, but because of the apodization filter inside that darkens the periphery of the lens, it effectively lets in as much light as a F4.5 lens. Hence the T4.5 suffix (T for effective light Transmission).

Also, the lens is manual focus only – which makes it the only Minolta/Sony A-mount lens that is manual focus. The reason why is because the apodization filter causes a graduation coming from opposite ends, making it impossible for phase-detect AF to work. I’ve explained this in another blog post.

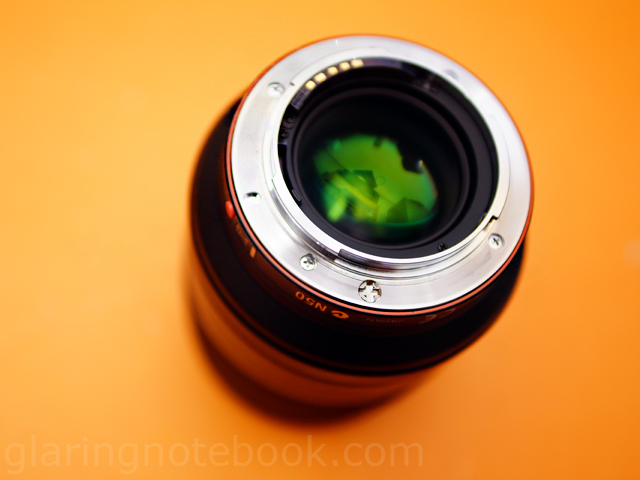
You can tell immediately that the lens is the STF from the back, from the cross-shaped AF screw drive screw (it stops the AF screw drive from turning) and only 5 pins.

The only Sony lenses with 5 pins are:
1) Sony 16mm F2.8 Diagonal Fisheye
2) Sony 20mm F2.8
3) Sony 28mm F2.8
4) Sony 135mm F2.8/T4.5 Smooth Transition Focus
5) Sony 500mm F8 Reflex

There shouldn’t be any reason why any of these lenses don’t get a Distance Integration chip, other than Sony not having the resources or time to migrate them from their Minolta versions.

Interestingly, SSM lenses have a flat screw with a small circle inside, although its purpose is the same – to stop the AF screw drive from turning.

This lens is on the end of every A-mount user’s wishlist – meaning you’d get every other lens you wanted, before this one. It is such a luxury (not that it is expensive) but it is such an optional want-to-have instead of a must-have. It doesn’t help that it’s manual-focus only and doesn’t transmit much. I wonder if they could’ve made a 85mm F1.4 with the same apodization filter, which would bring it down to 85mm F1.4/T2.2!


Normal lenses will draw out-of-focus areas with a hard, solid brush (quite like the Photoshop screenshot on the left.) The STF, however, paints out-of-focus areas with a soft, shaded brush (on the right.)


So here’s one from the Carl Zeiss 135mm F1.8, set to F2.8, on the A900…


…and one from the Sony 135mm F2.8/T4.5 Smooth Transition Focus, set to F2.8/T4.5, on the A900. The difference in rendition should be obvious!

You might also notice that the STF gives a tighter angle-of-view – this is because it extends when focusing, while the Carl Zeiss 135mm F1.8 has an internal focus mechanism. Internal focus mechanisms tend to make the angle-of-view wider as it focuses closer – thus the only time the Carl Zeiss 135mm F1.8 is truly 135mm is when it is focused at infinity.

It focuses to 87cm close with a maximum magnification of 1:4x – interestingly, the Carl Zeiss 135mm F1.8 also does a maximum magnification of 1:4x, but when focused to 72cm close (obviously, due to the wider angle-of-view.)

The STF also uniquely has 2 sets of aperture blades – it uses the set of 10 blades in manual aperture control mode, from T4.5 to T6.7 (stepless, but with clicks), or the set of 9 blades when set to A (auto). However, I have not tested this extensively as I have had no reason to stop down the lens!


Meanwhile, this is from the Carl Zeiss 135mm F1.8 at F1.8. I think you should be able to tell the difference between the STF and any other lens by now.


The background just melts into creamy goodness here.


You can try to put a distracting background, and it smoothens out nevertheless!


How about some harsh sunlight?


Magic hour. Here, the shading of the out-of-focus highlights is obvious. Also, the lens is remarkably free of cats-eye bokeh – where out-of-focus areas on the side become cats-eye shaped instead of perfectly round circles. This might be because the lens is much bigger in diameter compared to a regular 135mm F2.8.


Another street shot. Many would say that T4.5 is unliveable but I would not fear high ISO and a competent RAW processor!


I have to admit, I haven’t been shooting much street photography with a telephoto.


In the right kind of light, it can still get by!


Another indoor shot.


I have always had a shot like this in my mind – I just need to find more appropriate locations.


And then, I took it out in bright daylight…


Congratulations Syazwan and Nadiah!


Unfortunately, as the bush on the right was at the same distance to me as they were, it was in sharp focus. Photoshop CS5.5’s Content-Aware Fill is magical, yes, but it didn’t work so well for this!


This would be the day debut of this lens.


The classic Minolta color is all there.


Note how the sky peeking through the trees is not distracting.


By distracting, I mean like this – this was shot with a Minolta 50mm F1.7. So you see what I mean by bad bokeh? That sharp outline, around out-of-focus highlights, is called brightline bokeh.

Stringing Along

How much slower is a Java String object comparison, compared to a primitive int comparison? I was curious, so I made a little Android app to compare an array of integers and Strings 10 million times each.

package test.benchstring;

import java.util.Random;

import android.app.Activity;
import android.os.Bundle;
import android.util.Log;

public class BenchStringActivity extends Activity {
int MAX = 10000000;
int[] arrayInt = {0

L3D

I have held off buying an LCD or LED monitor for the longest time – it was only because my IBM P202, that had served me well, died when I went out for dinner. RIP IBM P202, 1999 to 1-Feb-2012. (Though I only got it on the 17th of September 2006 – nevertheless, 13 year old monitor, whoa!)

And so, I decided to skip LCDs, plain LEDs for… the LG D2342P 23″ Passive 3D LED monitor! It was a hefty sum of RM999, but well worth it.


If you’re wondering why the picture looks shaky and doubled, that’s because the D2342P is in 3D mode, with vertically interlaced 3D mode. This means that alternating horizontal lines are only seen by one eye. The 3D glasses are passive, meaning that they are not powered by batteries, and do not close on alternating frames (as active 3D glasses do – plus they depend on an invisible timing pulse sent by the monitor.) The glasses are also cheaper because of this!

The screen has a Film Patterned Retarder (FPR) that polarizes alternating horizontal lines differently, and the glasses are also polarized – hence you get two different images.

The only downside is that you lose vertical resolution – instead of the normal 1920×1080 resolution at 60 Hertz, you get 1920×540 resolution at 60 Hertz. Active 3D, meanwhile, requires a doubling of refresh rate to 120 Hertz, and the shutter glasses need to flicker to show an image to only one eye at a time.


Also, losing vertical resolution means you can’t read text easily – so you won’t want to keep wearing the 3D glasses even when 3D is off!

I connected it to my Sapphire ATI Radeon HD 5770 via DVI – regretfully I didn’t realize that my display card also had a HDMI output! That said, the D2342P only has one HDMI input, one DVI input and one VGA input, so I used the DVI for the computer, and a HDMI to Mini HDMI Type C cable to connect to my Sony Alpha DSLR-A900, Sony Alpha NEX-5 and Sony Alpha SLT-A77.


Here’s an Asus Eee Pad Transformer TF101 connected via HDMI to my monitor. It feels like a life-size rectangular steering wheel! Nicely, audio is also transmitted – though the D2342P doesn’t have built-in speakers, it has a headphone jack for this.

The TF101 uses a Mini HDMI Type C port, though the Transformer Prime (TF201) uses the harder-to-find-cables-for Micro HDMI Type D port (as do the LG Optimus 2X, Acer Iconia Tab A500 and Motorola Xoom.)


Also bundled is Omega Supreme. Nah, kidding. Tridef 3D is included – it includes a viewer that opens videos and pictures and somehow converts them into 3D in real time! Unfortunately, I could not get it to support certain formats e.g. FLV, though it works great with MPO 3D files from my NEX-5/A55/A77 with 3D Sweep Panorama. Also, Direct3D games are supported for 3D conversion, though not OpenGL games like Quake 3, sadly. This is a picture of the screen from Transformers: War For Cybertron.

The 2D to 3D conversion doesn’t get confused and seems to render depth properly, though sometimes there is a bit of a shadow ‘shape’ if you close one eye. You can tweak the intensity of the 3D effect as well as the convergence – though unfortunately, when the video played moves to a different scene, the convergence sometimes changes! So you end up having to use keyboard shortcuts to adjust the convergence again – or by moving back and forward or up and down (this would also fix the convergence.)

As for 2D regular use, the screen does alright – text is legible, and the Film Patterned Retarder isn’t noticeable most of the time with no 3D glasses on. A simple Windows 7 Display Calibration took care of the gamma and white balance, though I feel it’s still a bit bright. Color shifting does happen when moving to the side of the monitor.


Oh, and what the heck can you do with this box? I remember the days when buying a CRT monitor meant that you’d take out the monitor, and put all your stuff inside! You’d get a free, big, and very useful box!

What the heck can I put in this, again?

My first Android app live – DigiTech Patch Viewer!

(This post was edited 0209 hours 5th March 2012 +0800 GMT for Version 1.1.)

So I’ve finally uploaded my first (fully-completed) Android app to the Android Market!

Available in Android Market
DigiTech Patch Viewer

This lets you open DigiTech RP155, RP250 and RP255 multi-effects patch files using your Android device.

Ever been jamming at a friend’s place, or a studio, and you wanted to dial in that certain tone, but you couldn’t get it right? Then you Googled it on your phone but you find that in order to get the tone, you need to fire up X-Edit on a proper computer or laptop, and connect the RP255 by USB?

My app lets you view the patch – you’ll still have to dial in the settings manually. For convenience, all the settings are arranged as they are on the pedal!

Now it would be awesome to connect the pedal to an Android device via USB, but I don’t have an Android device with USB Host functionality and even then that might be too daunting a task! (I don’t have a Near-Field-Communication-supporting device, either…)

The RP155 and RP250 have beta support as of version 1.1, in the Android Market now. It may not show certain values, so contact me if you find such a patch file.

The RP255 is the only one I have to test all settings with – hit me an email if you’d like to help to test with your other DigiTech RP series multi-effects pedal! Fortunately, the RP presets are all plain, human-readable XML, so it’s quite easy – can’t say the same about other brand patch files.

If you have trouble opening patch files from your stock browser, use Firefox for Android. I found the Samsung Galaxy Note stock browser, for example, will rename any unknown files to *.bin.

In other news, I have a sample patch file – this is my current go-to metal patch, called “TAPMET”. It’s a high-gain balls-out metal patch with an interesting twist – the expression pedal is set to control equalizer mid levels.

TAPMET – click to download!

So if you push the expression pedal down at the heel, you get scooped mids (bass: 0, mid: -12, treble: 0) for some crunchy thrash metal rhythm, and when you push the expression pedal forward at the toe, you get a searing hot tone (bass: 0, mid: 12, treble: 0) for some tasty lead solos!

From various TT sessions in 2011


The Nikon F3, with the pentaprism removed.


Hairee through the Minolta 100mm F2.8 Macro on the A900.


Digital Life Expo 2011, at KLCc Convention Center, I think.


Another one from the DLE. There really wasn’t much to see, and the title already hints at a convergence.


Fire in the hole!


Another TT, also at KLCC.


This one at A&W PJ – the Sony 50mm F1.4 on the A900.


The classic Minolta look is gotten through this Minolta 85mm F1.4G on the NEX-5.


This is the Super SteadyShot mechanism.


This is a cheapo Fader ND – obviously made of two ND filters screwed together. Uses the same cross polarizer effect I blogged about 6 years ago.


This was shot with the help of Live View.


The 1Nikkor 10-100mm F4.5-5.6 Power Drive ZOOM VR!


Man, the lanyard gets in the way of me scanning her.


The Olympus 45mm F1.8 through an Olympus EP-3. What a lovely little lens!

Relationship Status: A Review

Greetings! I have something special for you today – a wordy blog post!

So I watched Relationship Status, a film by Khairil M. Bahar. (As a disclaimer – I know him and a few cast members and some behind-the-scenes people.)

A cautionary note: I often struggle to write a review of something if I know what I would criticize and forget how to underline the good bits.

The film is about a bunch of loosely-connected people who are in various types of relationships – with the general theme of Facebook, and its “relationship status”, affecting how they act and who they meet. The film is, well, mostly a lot of dialogue, with little or no action, other than one slap and mild pillow action. One might call it somewhat draggy because of this.

On the plus side, the dialogue is very real, and the pacing and articulation is what you experience in real life – kudos to all the amazing actors – but you might realize that Hollywood caters to the short-attention-span generation, and your typical movie scene is shorter, wittier, more dramatic, and faster-paced. As I watched the dialogues, it was as if I was an invisible fly, sitting in my neighbor’s house, listening to them have a leisurely talk.

I’m not sure if it’s just me, being a photographer, but it did bother me each time the Canon 5D Mark II used to shoot the movie, went out of focus – and it did, many times, with some scenes having the sofa be in focus, or the camera operator was inexperienced with focus pulling, especially when the actor was moving in the scene. It’s quite apparent when there is a sharp zone of focus across an actor’s cheeks but not anywhere else! I’d rather stop the lens down just a tiny bit as a full-frame video camera is unforgiving.

You know what movie has awesome bokeh? The Twilight Saga: Breaking Dawn: Part 1. I kid you not. The bokeh in that movie is awesome – backgrounds are painted with a lush, rich, saturated brush.

The other niggle I had, which might’ve been the projector, was the white balance – many scenes were shot (seemingly) with room lighting only, so you get the icky flourescent green and a pallid greenish orange for tungsten. It gives too much of an indie look which distracted me from the conversation – honestly I’d rather set the white balance to appear like daylight as that is how humans perceive it.

The camera angles are good, though there was one bit in Daphne/Tony’s scene where they are having a conversation, and it looks like the camera operator is standing in front of the sofa they are sitting on. It suddenly jumps to a eye-level shot of Daphne as she says something pivotal. Impactful, perhaps, but strange.

And of course there’s that rather bumpy baby bump. I did enjoy the scenes with Ruzana/Daphne, though, with the audience feeling the tense build up to the inevitable. I wish more of the movie was like this!

The movie starts with a guy writing “Hope your well” on a girl’s Facebook wall. Now this would be alright… if he wasn’t a writer. Apologies for the Grammar Nazi outburst. Heil The Queen’s English!

Hmmm, or was it a snide poke at how social networks and the Internet have killed our command of English? Then again, English is a language with terribly inconsistent rules.

Interestingly, Davina, and the character she plays, has the same birthdate! I wonder what other nuggets are there e.g. Ilmar.

I don’t know if it’s because I know Khai, and I’ve seen his previous movie, Ciplak (which was awesome, and high on entertainment value and his trademark humor) that I couldn’t help but feel that this was not what I had expected. Plus he had experience in the Malaysian film industry, as well as short films of all sorts (which I always looked forward to, because of entertainment value).

Nevertheless, it is a good movie that feels real. So please go watch Relationship Status at a TGV near you today! (Also, TGV has massively overhauled their site and it is real snazzy that it doesn’t need any plugins. Well done!)

35mm Showdown

Here’s a casual comparison of a few 35mm lenses on the Sony Alpha NEX-5!


From left to right: Samyang 35mm F1.4 ED AS UMC ED AS UMC, Sony 35mm F1.4G, SLR Magic 35mm F1.7, Sony 35mm F1.8 DT SAM DT SAM, Carl Zeiss Biogon T* 35mm F2.0 ZM with Kipon M-mount to E-mount adapter.

All shots at 1/60s ISO200 in Manual Exposure on the Sony Alpha NEX-5 with the Sony LA-EA1 A-mount to E-mount adapter, or the Kipon M-mount to E-mount adapter, where appropriate. The aperture was adjusted from wide open, to F2.0, and then F2.8. I intentionally did not change the shutter speed, but changed the exposure in RAW (for example, an exposure at F1.4 has an EV of 0 while an exposure at F1.8 is compensated by +0.7EV and F1.7, +0.5EV.)

All RAWs were processed in DxO Optics Pro Elite 7.0 with DxO Lighting turned off and a fixed WB of 4628 Kelvin, +6 Magenta compensation. You may notice some differences in exposure – whether this is down to F1.4 being not exactly 1 stop brighter than F2.0, or DxO not linearly adding +1 EV, I do not know.

The other difference may be in the white balance, since this was shot in flourescent light. Thus pay no attention to variances in white balance unless all samples from the same lens, have a certain color cast.

The objective of this test was to compare bokeh, originally, but you might also be able to judge light transmission, color and contrast. Sharpness is variable as I focused on the chair (without realizing there was chipped paint that I could’ve used as a focus reference point.)

All images are clickable for a full-size image. EXIF data is also included in both full-size images and thumbnails (if you can call these thumbnails.)


Samyang 35mm F1.4 ED AS UMC at F1.4


Samyang 35mm F1.4 ED AS UMC at F2.0


Samyang 35mm F1.4 ED AS UMC at F2.8


Sony 35mm F1.4G at F1.4


Sony 35mm F1.4G at F2.0


Sony 35mm F1.4G at F2.8


Sony 35mm F1.8 DT SAM at F1.8 (+0.7EV)


Sony 35mm F1.8 DT SAM at F2.0


Sony 35mm F1.8 DT SAM at F2.8


Carl Zeiss Biogon T* 35mm F2.0 ZM at F2.0


Carl Zeiss Biogon T* 35mm F2.0 ZM at F2.8


SLR Magic 35mm F1.7 at F1.7 (+0.5EV)


SLR Magic 35mm F1.7 at F2.0 (may not be exact due to stiff aperture ring)


SLR Magic 35mm F1.7 at F2.8 (may not be exact due to stiff aperture ring)

A casual verdict:
The Sony 35mm F1.4G’s trademark spherical aberration is always there – a portrait-ful haze of softness around out-of-focus areas. The bokeh may vignette at F1.4 and be somewhat of a circle with a side cut away, but at least they remain circular and not a cats-eye shape (on APS-C at least as tested here). It retains that Minolta color. Unfortunately I misfocused so please ignore the sharpness aspect of this lens. I love this lens for its bokeh, really, and how it renders, but it’s not everybody’s cup of tea.

The Sony 35mm F1.8 DT SAM is contrasty wide open, especially in the out-of-focus areas. I can’t say this helps, really, as it makes the background contrasty and distracting. Zeiss lenses tend to look that way too. It also ‘paints’ out-of-focus with less distracting harsh edges (brightline bokeh) compared to the SLR Magic 35mm F1.7. It does not render softly wide open. The out-of-focus areas also pull out somewhat. Fortunately, it doesn’t seem to vignette out-of-focus areas.

I can’t say I like the colors from the SLR Magic 35mm F1.7. At F1.7 it has that pleasant portrait softness.

The Carl Zeiss Biogon T* 35mm F2.0 ZM does not disappoint – it’s a Zeiss and that means it’s sharp and contrasty wide open. Some lenses have great bokeh but this is not one of them – you can see some brightline bokeh here.

And finally, the Samyang 35mm F1.4 ED AS UMC – bokeh isn’t great, a bit distracting, and sharpness gets better at F2.0 (could be misfocus, though) and much better at F2.8.

More reading:
Not Through The Leica

Not Through The Leica


And now, for pictures of the Leica M6 TTL!


Mounted on it was the Carl Zeiss Biogon T* 35mm F2.0 ZM.


From the top. The flash sync is 1/50th of a second. The soft shutter release was also installed on this. Also note the film winder on the left is at a diagonal angle – I absent-mindedly tried to pull on that to open the film back! (As it is with all other manual-focus film SLRs.)


The back. The ISO is also set here. Strange that they’d say ISO and not ASA. There was also a PC Sync port below the flash hotshoe – note that in this case, PC Sync stands for Proctor Compur Sync (cable).


You’d remove the film by removing the bottom plate, and opening the back plate.


From the front. To the right of the lens mount is the frameline selector lever – press on it and it toggles between 3 sets of framelines. I believe this was the version with 0.72x framelines as its initial framelines were 28mm/90mm, 35mm/135mm, and 50mm/75mm.) (Thanks Neo for the correction!)

The top plate, from left, has the Rewind Lock lever (press this, and you’ll be able to rewind your film once you’re done) then the secondary window, the frameline window and the main window. What you see in the viewfinder is a combination of the secondary window and main window (with the framelines getting light from the frameline window.)

A problem with rangefinders is that you can cover your lens and take a picture, and not know it! Since you’re not looking through the lens, but through a separate window, there is also the issue of parallax – but the M6 cleverly adjusts for this by moving the framelines as you focus closers. Because of this parallax issue as well, I reckon, there is a limit of how close rangefinder lenses can focus.


This lens goes to 0.7 meters close.

Of course, there are some lenses that do focus closer, but often with an extra attachment.


Another interesting usability element in rangefinder lenses, is that they often have a knob for your thumb – so you could quickly focus to a certain distance by feel, by adjusting the knob to a known position.


A cheaper option to going digital with a Leica M-mount system would be to buy an adapter to a mirrorless camera system, like the Sony Alpha NEX system. On the left is the Sony Alpha NEX-5 with the Kipon M-mount to E-mount converter. The only thing you lose is a wide angle of view, since the NEX-5 has a 1.5x crop factor. Thus the angle of view of the 35mm on the M6 becomes like 52.5mm on the NEX-5.


Same lens, this time on the NEX-5. Very much possible this way due to the shorter flange distance of 18mm. A lens mount that has a bigger flange distance (distance from lens mount to sensor/film plane) than the lens being mounted, needs an adapter that has glass, to retain the ability to focus the lens to infinity. Of course, without the glass, it may become a macro-only lens! This is why you don’t see M-mount lenses being mounted on my A900, for example.

The other thing about these adapters with glass, is that the optical quality degrades and it is in fact a teleconverter, so you lose light and get a narrower angle of view.


Anyway, this is the Leica Noctilux-M 50mm F0.95 ASPH at the Leica Global Store at Avenue K.


This picture, and all pictures that follow, were shot wide open at F0.95.


I mounted it on the NEX-5 with the Kipon M-to-E-mount adapter.


Of course, APS-C lends more depth of field…


Creamy bokeh!


Of course, I’d rather test such lenses with portraits.

Here’s a great explanation of how rangefinders work:
http://photozone.de/slr-vs-rangefinder

More pictures here:
Leica Superia!
Leica Vista!

Leica Superia!


And now, for more from the Leica M6 TTL and Carl Zeiss Biogon T* 35mm F2.0 ZM combo! I love the color of this shot. Also, Papillon 1973 in Solaris Dutamas makes the best burgers around this area (second only to adding pork, which Brussels Beer Cafe is awesome at!)

There was also the memorable Fish & Chippery with fantastic cheeseburgers but that place closed down. 🙁


All shots were shot at F2.0 unless otherwise stated. No color, contrast or brightness adjustments were done – I just did an Unsharp Mask with amount 90%, radius 0.3 pixels, threshold 3 levels, before resizing it.


I used Fujifilm Superia X-TRA ASA400 for all pictures in this series. I believe this was shot at F8. As always, emerald greens are apparent!


I took a wild guess, aiming at about 2 meters. Fortunately this was nailed!


The view from my cubicle. Coder’s block.


Underexposure results in lowered contrast and muddy blacks.


Muddier! Shot at 1/15th of a second if I remember, to avoid motion blur.


Educated beggar.


The cliched homeless person street shot.


Petaling Street bags your attention.


A small enclave somewhere off Petaling Street hosted a lot of tattoo parlours!


Shoe man.

More here:
Leica Vista!